Tuesday, December 23, 2008

Love You Much

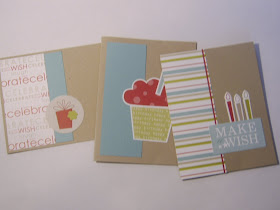
I know it isn't even Christmas yet but it is time to get ready for valentines day with the love you much bundle! The promotion starts today and lasts until January 31st but the reason you need to know this today is because this is the last day for FREE SHIPPING.

Shipping is free on orders of $70 or more so if you want to combine it with some orders I am turning in today just call or e-mail me. The Items in the bundle are 20% off, you will be able to order them all individually when the new catalog comes out but not at the 20% off.

My favorite part is 2 of the images fit in our many punches. Check back after christmas and I will be posting some projects using these items!

Friday, December 12, 2008

christmas jar

This jar was a lot of fun to make but it looks better in person! First I cut out a chocolate snowflake and I put it inside the jar (it is hard to see in the picture) then I added a large celo bag and filled it with chocolate covered pretzels! Then I tied it with some alpine ribbon and added a vinyl snowflake to the front.

Here is a close up of the tag and the yummy pretzels.

A smaller journal

I made this journal for a hostess this month. I just covered it with DSP and I inked the chipboard letter with chocolate chip craft ink. This was super easy and fun!

Tuesday, December 9, 2008

10% off Retiring Stamps

The Retired Stamps list is out and as an added bonus you will receive 10% off all of these stamps until December 23rd, and if your order total is $70 or more you will also receive free shipping!! the free shipping applies to all orders not just the retired sets.


click here for the list of retired stamps with the 10% off prices

click here for the list of retired stamps by page number

click here to head over to order online

e-mail me if you have any questions at kasia567@yahoo.com

Sunday, December 7, 2008

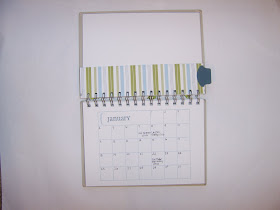
My Planner

I have had this planner for about a year now and I love it, I first saw the idea in a stampin' success (a magazine for all the demos) and I made it my own. I just changed the front again to use the build a flower die and chipboard. I used this color scheme so it will match my tote bag I got at convention.

Inside each month I stamp the Calendar & Full Calendar stamps and create my own calendar for the year. I would love to have the It's a Plan stamps also. I always like to have things planned out (can you tell). I also used the spiral punch to make a bookmark so I can flip to the right month.

This is also where I keep a list of our doctors, I punch the end of their business cards with the spiral punch and I have a doctors section.

Saturday, December 6, 2008

Dec Club Card


At my scrapbook club we make a card to match the page and here is this months creation.

Friday, December 5, 2008

Front Door Fun

I spent a little time today decorating my front door, I ordered the Medium Welcome from Stampin' Up!'s Decor Elements and I made the snowflakes with my big shot die. I was worried that it would be hard but it was seriously easy and a lot of fun, my 5 year old had fun helping me.

Wednesday, December 3, 2008

December Club Pages

I went out of the box this month, I didn't use any old olive :) well except for a tiny tiny bit in the ribbon. I used so many new things to make this page, it was so fun. I have been slowly collecting the big shot dies even though I don't have a big shot yet. gasp I know, but hopefully soon. I borrowed the big shot from Becky, thanks tons!!! and I had so much fun using the dies. I also really love the Alpine ribbon from the mini catalog it gave my page the perfect look. A word of advice: I used Dotto to adhere the letters from the go go boots dies and the snowflake to my pages, it is so easy cause it is not only repositionable but removable too!! I used the tree and acorn stamps from the Lovely as a Tree stamp set and the Flower from Fall Flair.

Tuesday, December 2, 2008

100 Trees

I have been working on, and helping others with few projects lately and I thought it was about time to add another post :) I try to only post samples of images that are in the current catalog (this tree stamp is retired) but I thought it would be fun to show you what 100 trees looks like. I was helping to make these invitations and I think they turned out pretty cute, we had to make them pretty simple since we were making so many. I was on the stamping end of the assembly line, my fingers hurt a little bit after stamping 200 trees but thankfully it didn't last long at all.

In my pictures the flash made the embossed image shine but I love it looking so shiny.
For the ribbon we just stapled it all together and tied a ribbon around it, thanks Meg for the idea, it worked great for this project cause it was so easy. Just staple the ribbon and the cardstock at the same time and then tie it in a knot! One thing I love about embossing is how long a 1/2 ounce of it lasts, it is like it just replenishes itself, and it is fun to watch it change from powder to shine. We also stole the quote from the same stamp set (I hope that is ok). The stamped image didn't fit just right so we just printed it with the other info.

My first Award!!

How exciting, my first award! Megan nominated me for this award. Thanks Meg!! (can I call you meg? it remindes me of hercules :) She is super talented and when I have time to browse her blog is always one of the first I check. I know I need to nominate someone else but my top picks just got nominated so I will try to think of someone else and add them later.

Wednesday, November 26, 2008

It is here!!!

SALE ENDS DECEMBER 1st!!
click here to see the flyer
Stampin' Up!'s holiday extravaganza sale is here!! This is a very short but awesome promotion. Stampin' Up is offering 30-50% off select product bundles while supplies last. You can order them through my website or by calling or e-mailing me.
Be one of the first 20 people to order from me and you will receive a free gift from me!

Wednesday, November 19, 2008

Deborah's second challenge

This was the inspiration for Deborah's second color inspiration challenge. It has been a while since I designed a card so I thought I should play along. Here is what I came up with.
It was fun to stamp the flower in versamark and to see the watermark show up on all the colors differently. I also love the little flower charm.

Tuesday, November 18, 2008

September's stamp club pages

I never posted this club layout and some of my girls need to look at it so here is September's club pages. I totally cased Mandy's birthday page which is why I didn't post it in the first place but I did change it a bit. We used the Big Bold Birthday and Contempo Alphabet (my new favorite alphabet). To make the red triangle, I cut the chipboard square inside the scallop square frame in half with my trusty cutter then we inked them both with craft real red ink.

Friday, November 14, 2008

Exploding Box

I made this cute little exploding box. I only made one layer because I just filled it up with a lot of mini candy bars :)


easy reminders


I needed a quick reminder to send out and this is what I came up with. I used So Saffron, Tangerine Tango, and Old Olive ink.

Wednesday, November 12, 2008

Fast and Easy Birthday Tag

I made this birthday tag for my cousin yesterday as I was on my way out the door. I think it took a whole 2 minutes to complete it including the time it took to mount the stamp (I love the die cut stamps!!!) I inked the image with the tangerine tango stamp pad and wiped off the words with a baby wipe, (they are always handy at my house) and I inked the words with my old olive marker. I stamped it again in bashful blue and with the help of a circle punch and a dimensional it was complete!

Tuesday, November 11, 2008

Together

I offered a 12x12 swap with my downline this month and this is the page I designed for it. I love love love the basic grey with the baja breeze. I will have to remember to take some pictures of my husband and I and print them in black and white for this page.

Monday, November 10, 2008

jingle all the way

Here is another decor elements frame, this one looks a lot better in person. I love these to decorate with because I love the way the vinyl looks on the glass and they are so easy to make. This is an 8x10 frame and I used the medium jingle all the way image. I changed the background color a lot, I really wanted the words to stand out and the olive or baja breeze DSP didn't contrast enough so I just matched the frame with the white. If you look closely you can see the baja border peeking behind the white.

Thursday, November 6, 2008

Create-a-Calendar '09

The Holiday Mini Catalog has the coolest calendar this year. It can be used so many different ways, I have seen it as just a planner, on the onboard clipboards, standing up like the desktop calendar, and on a full sheet of cardstock (a lot like mine). I really liked the idea to display it I just wanted mine to be more sturdy so I attached it to the on board basics. It was really easy to create and a great gift! This is a class that I am offering this year, if you would like me to teach you how to make this let me know!

My favorite part is the storage spaces, you can see here on the back the extra months are safely stored on the back and the stickers to decorate the calendars are in a little pocket on the front! I also love the clip from the Clips Assortment on the front to make it easy to change each month.

Wednesday, November 5, 2008

We have a winner!

Blog Candy Winner: is JEN!!!
I entered the names into Random.org to make it fair. Congrats Jen, e-mail me your address (kasia567@yahoo.com) and let me know what letter you want!


There were 4 items in your list. Here they are in random order:
Jen
Liz
Ball Fam
Ashley
Timestamp: 2008-11-05 18:22:03 UTC

Best Ever

For my class on Saturday we are making a birthday stationery box that was designed by Jackie Topa. We are using the Best Ever Simply Scrappin Kit. This box is amazing, it holds 10 full size cards and envelopes, 6 3x3 cards and envelopes and 6 tags. I modified this box to make it easier to make and stronger. I still have 2 spots open so let me know if you want to come make it with us!


Monday, November 3, 2008

Blog Candy Time!!!

I absolutely love getting comments on my blog so to say thank you I wanted to give away 2 gifts for my blog candy, one for the person who has posted the most comments and one to one of you to say thanks for visiting my blog!! Now before you go back and check out to see who has left the most comments, well 2 of you posted a lot but one of you posted 21 comments on my blog (I only have 42 posts) and the winner is drum roll please ....... Megan!!! thanks for your comments! ok now I have another give away for one of you. All you have to do is leave me a comment on this post and tell me something that is your favorite (color, stamp, recipe, etc.), if you don't have a google account just click the anonymous and leave your name, you have until Wednesday Morning when I wake up and turn on the computer (do you like how specific it is, well you have more than 24 hours and don't worry I never wake up before 7:00). Do you want to know what the blog candy is??? I want to give you your own supplies to make a decor elements frame!!! click here to know what I am talking about. This includes a white frame, 2 pieces of 5x7 DSP (that will already be inside your frame) and some ribbon already tied around it to match one of the pieces of dsp. When I announce the winner I will just need to know which monogram letter you would like and I will order you a white one to match the frame you will receive the uppercase letter unless you request the lowercase one. You can also request some dsp and if I have it I will be happy to put this inside, so Megan Let me know what you would like and good luck to the rest of you :)

Saturday, November 1, 2008

More than 1000 hits!!

Wow I just noticed that my blog has had more than 1000 hits! I think it is time for some BLOG CANDY!!! (or a really cool giveway) Come back on Monday to see what it is :)

Another Upsy Daisy card

This is one of the cards we made at my class today. We used the Urban Garden DSP and the Upsy Daisy stamp set. I love this paper and stamp set! I first saw this paper at convention, they had it laying out on a table for us to look at, I knew when I saw it that It would be on my shelf soon. When I got it I also ordered some 12x12 basic grey cardstock thinking I would make a scrapbook layout but It first turned into a card :) Maybe one day this will be in my scrapbook.

Halloween Fun at Stampin' Up!

I love Stampin' Up! and I would love to work in the home office someday doing absolutely anything. Check out how funny these people are here and make sure you watch the video at the end of the post!!! Kristina works there and she has a fun blog as well. I totally want to dress up as a stick person one year!!

Thursday, October 30, 2008

Color Combos

I have seen something like this before but I just found it again and thought I would share. This is a cool website to help you choose colors and it is fun to play with! Check it out here.

Wednesday, October 29, 2008

Kit Kat Mummy's

My son has a preschool Halloween party this week and all the kids are bringing treats for the halloween game. I couldn't resist making something cute mostly because his teacher loves everything I make and partly because I like to be the cool mom, just kidding. It was fun to see him so excited about them. I made these at night while he slept so I showed them to him when he woke up, I wish I got a picture of his smile. I know the kids won't appreciate them but hopefully a couple of the mom's will save it from the garbage :) I saw these cute candy bar holders here and also here and I put it in my "I need to make this" folder. I really think that this is one of the first times I have used creamy caramel, (yeah I know I get into a color rut a lot, have you seen too much of old olive and bashful blue yet?? one of my club girls even was brave enough to mention that she sees a lot of the old olive in our projects, I will try to be better I promise :) I don't even own the creamy caramel stamp pad technically (my sisters is at my house cause she doesn't think she will use it without me (she is just like my mom, oh well), thanks for sharing Kristi!!) but it was one of the funnest halloween things I have made and I plan on using this color again!!

Tuesday, October 28, 2008

Decor Elements and Class to Go!

Ok this is definitely my favorite. I posted more pictures of my frame here when I couldn't decide which background was my favorite but I finally found it. I love how the paper looks with the chocolate decor elements and the matching ribbon is so cute. The greatest thing is that I can change the background and ribbon anytime. I love looking at this sitting on my shelf in my stamp room. This is one of the projects that I am giving to my hostesses this year and they love it (and are starting to expect it)!
If you would like me to make one of these for you, contact me and we can set up a workshop. If you don't live in the Salt Lake area I would be happy to ship one to you for $10. This includes the frame, any Classic letter of your choice from the decor elements brochure, (you will receive both a upper and lowercase letter) and you have your choice between Chocolate and White. You will also receive 2 5x7 sheets of DSP and some matching ribbon.

Monday, October 27, 2008

November Club Projects


I am so proud of myself, I already have next months club projects designed!! A couple of girls in my club have already seen it so I thought I would share it with everyone. We will be using the Haiku DSP and the Season of friendship stamps.

Saturday, October 25, 2008

3 spring cards

Here are some spring cards that I absolutely love, I took pictures of these at Jill's downline meeting. I have no idea who made these to credit but I just know I didn't make them :) to see my other spring cards and instructions how to make them click here.

Thanksgiving

I had a workshop today and I always like to demonstrate a scrapbook page, this time I stamped the title and put most of it together before the workshop. All I demonstrated was the turkey feathers and of course dotto, I love dotto!!! It was fun, we had a small group so I let everyone punch a scallop circle and learn to fold the turkey feathers. We (all the demonstrators) learned how to do this awesome fold from our monthly magazine Stampin' Success. Stampin' Up! has great resources for us. Does this layout look familiar??

Friday, October 24, 2008

Door prizes

These are some fun door prizes that I gave away at my class last night. I filled the celo bag with ribbon and stamped images from the Say it with Scallops stamp set. Instead of a bag topper, I just stuck a piece of cardstock inside and punched through it all and Tied it with a ribbon.

Wednesday, October 22, 2008

Birthday Party

Tonight I helped my friend and her daughter make birthday party invitations. They are so trusting, I just told them what we would make and they didn't get to see the finished product until after we stamped them, I didn't even make one in advance! Well from experience everyone loves these cards so I knew they would too. The birthday girl actually stamped all of the presents and helped to put them together. I was really impressed. We couldn't decide on a color so we made a few of both blue and pink. Which color do you like the best?

I know you have seen a bunch of these on my blog lately so I will try to not post any more for a while :)

Just Jawing

My friend Tia gave me this awesome card at our last demo meeting! Mr Skull (I think that is what she called him) is from the Just Jawing stamp set. This is one of the stamp sets that hostesses can earn for free between now and November 30th. Would you like to know the other stamp sets that you could earn free right now?

Saturday, October 18, 2008

Soccer Thank You's


I am in love with the spinner cards, you will probably see many more from me :) These are some thank you cards (and gifts) for my son's soccer coaches. This was the easiest card I have ever made. Just a couple of stamps, and a lot of dimensionals! Sorry for the poor light, it is pretty late, the card is actually Basic Black (not grey). The gift is simple too, just some popcorn and candy and a free movie rental but what do you really get for men?

Seriously


This is a possible Class layout for a class with teenagers next week. I cased the first page from Brandi and Deanne. I love this paper and this stamp set Seriously Sassy. It is on the dormant list this year and is such a cute teenager stamp set. I would love to teach you how to make this page or one of the accents, if you are interested, just let me know and we can schedule a class or workshop! Click on the picture to see it better.

Thursday, October 16, 2008

Deborah's Color Inspiration Challenge #1


I just found my friend Deborah's blog, she is my sideline and has awesome business ideas! She is starting her own Color Inspiration Challenge and I thought I would play along. This is the first one I have participated in. The colors she chose were Mellow Moss, Night of Navy, Whisper White, and Really Rust. I haven't used Really Rust since Stampin' Up! included Pumpkin Pie to the 48 colors so it has been a while :) it was nice to dust off my stamp pad. I also have a pretty huge supply of Really Rust Buttons from the Earth Elements assortment so I figured I needed to add them. I used my Upsy Daisy Stamp set for the first time as well so I can check off another thing to do on my list. To create all the colors I sponged the ink onto the stamp using sponge daubers.

Simple Birthday Thanks

We made this card in my stamp club this month. I saw another cute card with this stamp here and changed it for my girls. I love this stamp, it is easy to stamp without the words and I think it is a cute way for kids to send birthday thank-you's. We stamped it 3 different times to have the different colors, cut it out and put it together.
We shined up the cherry and attached the micro beads with Crystal Effects. Some girls even put the micro beads on the stem. One thing I will suggest is to put the crystal effects to attach the beads on first and then add the crystal effects to the cherry!

A great swap


I was given this great swap at Brandi's downline meeting. Our group is really talented and the swaps are fantastic. One of my favorite things about our group swaps is that they are a full card (not card fronts like at convention) so we can use them (or give them away) later. This is one card that I will probably never give away! Thanks Candice for sharing your great ideas!

Monday, October 13, 2008

A Holly, Jolly Christmas

Here are the other two cards I designed for last Friday. The first one is my favorite, it is a spinner card and when you tip it the reindeer spins down the word window.

To make the Santa card, we punched the square out of the front of the card and attached Santa to the inside. We also embossed the Santa with Iridescent Ice Embossing powder for an all over shine!