To create the card base start with a 5 1/4 x 9 piece of cardstock and score at 2 1/2, 5 1/2 and 8 1/2 inches. Punch the images as shown. I used the 1 3/8 inch square and the 1 inch circle. (the 1 1/4 inch circle also works great) You want the circles to be centered and the squares to be off centered, try your best to get the square section level.
 Cut a 1 inch strip off a cellophane bag for the next step. I use the large celo bags that demonstrators can order on the supply order, they seem to work best for me but the Large flat celo bags should work too. I use the supply order ones so I can cut off the fold lines, this way the card will slide easier without getting stuck.
 Attach the celo bag strip around the cardstock as shown and adhere it together with a strip of snail. Make sure to only attach the celo bag to itself don't get adhesive on the cardstock or it won't slide :) Cut off the excess celo bag.
 Next you will need your sliding pieces. I forgot to take a picture of them and they are now attached to my card so scroll down to the last picture to see what I am talking about, they are the pieces with the trains on them :) The Old Olive cardstock is 2 3/4 x 4 inches (you will need 2 of them) decorate them now before you attach them to your card.
Use a small strip of sticky strip to attach the sliding pieces to your card. I like to place my first strip just below where I snailed the celo bag together. Then turn your cardstock over and fold the 2 1/2 inch strip in to look like this. Line the sliding piece (old olive) up with the bottom edge, center it between the edge and the score line. Then center the celo bag in the middle of the sliding piece. Once everything is lined up, remove the backing on the sticky strip and adhere it to the very top of the sliding piece (you can still see where I snailed the celo bag together).
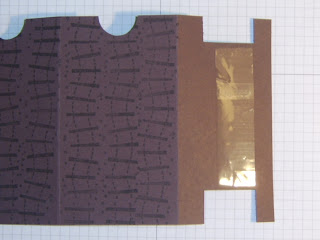
 Open the flap again and line up the next sliding piece as shown. Just make sure it is lined up at the top of the chocolate chip cardstock and that it is even with the other sliding piece (it doesn't matter if the celo bag moves at this point). Adhere it with sticky strip also this time on the bottom edge.
 Place sticky strip on the outside of the 1/2 inch flap. (sorry I forgot to take a picture again :) Fold the card together and attach the sticky strip flap to the chocolate chip cardstock.
 Next you will need your sliding pieces. I forgot to take a picture of them and they are now attached to my card so scroll down to the last picture to see what I am talking about, they are the pieces with the trains on them :) The Old Olive cardstock is 2 3/4 x 4 inches (you will need 2 of them) decorate them now before you attach them to your card.
 Use a small strip of sticky strip to attach the sliding pieces to your card. I like to place my first strip just below where I snailed the celo bag together.
 Then turn your cardstock over and fold the 2 1/2 inch strip in to look like this. Line the sliding piece (old olive) up with the bottom edge, center it between the edge and the score line. Then center the celo bag in the middle of the sliding piece. Once everything is lined up, remove the backing on the sticky strip and adhere it to the very top of the sliding piece (you can still see where I snailed the celo bag together).
 Open the flap again and line up the next sliding piece as shown. Just make sure it is lined up at the top of the chocolate chip cardstock and that it is even with the other sliding piece (it doesn't matter if the celo bag moves at this point). Adhere it with sticky strip also this time on the bottom edge.
 Place sticky strip on the outside of the 1/2 inch flap. (sorry I forgot to take a picture again :) Fold the card together and attach the sticky strip flap to the chocolate chip cardstock.
Decorate as desired. Here is the finished product.

Let me know if you have any questions and if you use my tutorial, link a picture, I would love to see your card!
Happy Stamping :)


Thanks for the great tutorial! I can't wait to try making one of these cards! You are awesome! :)
ReplyDelete